

Buckeye Discoveries
go.ncsu.edu/readext?153784
en Español / em Português
El inglés es el idioma de control de esta página. En la medida en que haya algún conflicto entre la traducción al inglés y la traducción, el inglés prevalece.
Al hacer clic en el enlace de traducción se activa un servicio de traducción gratuito para convertir la página al español. Al igual que con cualquier traducción por Internet, la conversión no es sensible al contexto y puede que no traduzca el texto en su significado original. NC State Extension no garantiza la exactitud del texto traducido. Por favor, tenga en cuenta que algunas aplicaciones y/o servicios pueden no funcionar como se espera cuando se traducen.
Português
Inglês é o idioma de controle desta página. Na medida que haja algum conflito entre o texto original em Inglês e a tradução, o Inglês prevalece.
Ao clicar no link de tradução, um serviço gratuito de tradução será ativado para converter a página para o Português. Como em qualquer tradução pela internet, a conversão não é sensivel ao contexto e pode não ocorrer a tradução para o significado orginal. O serviço de Extensão da Carolina do Norte (NC State Extension) não garante a exatidão do texto traduzido. Por favor, observe que algumas funções ou serviços podem não funcionar como esperado após a tradução.
English
English is the controlling language of this page. To the extent there is any conflict between the English text and the translation, English controls.
Clicking on the translation link activates a free translation service to convert the page to Spanish. As with any Internet translation, the conversion is not context-sensitive and may not translate the text to its original meaning. NC State Extension does not guarantee the accuracy of the translated text. Please note that some applications and/or services may not function as expected when translated.
Collapse ▲ This feature is by Cynthia Wagoner, Extension Master Gardener℠ volunteer in Gates County, NC. The title of her column is “Buckeye Discoveries” because she is from Justus, Ohio, the buckeye state. Since 2012, she has written about her horticultural discoveries since moving to Gates County.
Remember to call the Ask A Master Gardener Helpline with all your gardening questions. The number for Chowan, Gates, & Perquimans County residents is (252) 482-6585. It is open Tuesday and Thursday from 10 a.m. to noon.
Community Garden to Open in Gates County
Coming soon to Gates County is a community garden to be located at the Community Center next to the high school. Shayla Hayes, GP4H Coordinator and coordinator of the project, recently met with me to answer a few questions regarding this project. Below are the questions, as well as her answers:
Who is involved in the leadership of the garden, and who will be the participants? The community garden project was initiated by Gates Partners for Health. Gates Partners for Health is a network of community-based organizations, agencies, and individuals who are dedicated to improving the health and quality of life of those living, working, and playing in Gates County. The efforts of Gates Partners for Health are coordinated through Albemarle Regional Health Services and are guided by priority areas that are selected based on the latest Community Health Needs Assessment data. Our community garden initiative is being supported through ECU Health Roanoke-Chowan Hospital’s Community Benefits Grant program. We received funding to support the development of a new community garden in Gates County as well as to provide support to any already existing community garden efforts, in the community. While funds for this project were secured through Gates Partners for Health, we truly want this garden project to be a community effort. Community gardens are most sustainable when the community buys in and takes ownership of the efforts. We want this effort to bring the community together. In an effort to do so, we developed a Community Garden Planning and Development Committee, which is made up of some key community-based partners. Those partners include, Health Department Staff, Community Center Staff, Gates County Cooperative Extension Master Gardener Volunteers, our local 4-H agent, members of local faith communities, students and staff from Gates County Schools, as well as representation from the Gates County Board of Commissioners. All of whom will be involved in the development and upkeep of the garden, moving forward.
What are the goals of the project? The primary goal of this project is to increase access to healthy foods in the community while contributing to food security, helping individuals to learn about food systems, supporting local agriculture, and creating hands on learning activities that also provides the opportunity to engage in physical activity. Gates county has its challenges when it comes to access to healthy foods. It’s a rural community with limited access to fresh, affordable foods. While a community garden won’t fix the issue of access to healthy foods for the community, it is a step in the right direction. Community Gardens are a great way to promote healthy eating and chronic disease prevention. The 2021 Community Health Assessment data indicates that the three leading causes of death in Gates County were heart disease, cancer, and cerebrovascular diseases. According to the CDC, eating healthy helps in the prevention, delay, and management of chronic conditions such as Obesity, Type II Diabetes, Heart Disease, and other chronic diseases. Community Gardens are an evidence-based intervention when it comes to chronic disease prevention and increasing access to healthy foods. They not only generate healthy foods for the community, but they also provide an opportunity for physical activity. Tending to a garden requires light aerobic exercise such as walking, bending, and lifting. Anyone with experience in gardening will tell you that it can certainly be a workout.
Where will the garden be located? The garden will be located at the Gates Community Center. The Community Center already had an existing garden that was developed some years ago through a different project. The garden still exists, but the Community Center shared that the initial momentum of that the project has significantly dwindled and that the garden could use some updating and revitalization. We are excited about the opportunity to pour into the Community Center’s existing efforts to help revamp the garden through the collaboration of a variety of community-based partners. We hope that this effort will re-spark some interest from community members of all ages and backgrounds. Again, we truly want this to be a true community effort, and we feel that having the garden located at the Community Center, where many community members are already visiting and participating in various activities, will help us to further that mission.
When will this projected garden be established? Our goal is to start a Spring/Summer garden. We plan to complete the garden’s initial development by June 2023. However, we know that gardens are constantly a work in progress. It is our hope that this initiative will act as a spark to rejuvenate community gardening efforts in Gates county and will be an on-going initiative that will benefit the community, for years to come.
Who is responsible for the upkeep? Individuals or groups? The community is! Any and every one interested in learning about gardening or wanting to give back to the community is invited to participate and help us tend to the garden. The success of community gardens is a direct reflection of the efforts of community members. Anybody living, working, or visiting Gates County can volunteer to participate in the garden’s development and upkeep. We are inviting community members to volunteer to come out and help us to get the garden re-established through the prepping of beds and planting of plants on Saturday, April 29nd from 9 a.m.-1 p.m.
Those who wish to volunteer must sign up at: https://signup.com/go/RWrYuTD or by calling Shayla Hayes at 252-426-2105. To learn more about the community garden and other volunteer opportunities, Contact: Shayla Hayes at: 252-426-2105 or shayla.hayes@arhs-nc.org
Care of the Christmas Cactus: After the Holidays
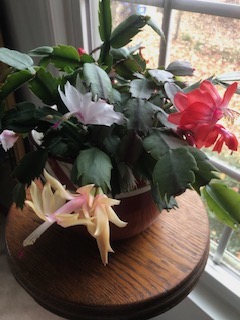 Approximately three years ago while in Virginia Beach at a nursery, there was a table in their greenhouse full of yellow Christmas Cacti. YELLOW! (Yellow is among the rarest varieties). I bought two: One for my friend, Ruth, and the other one for me. My goal was to propagate this plant and give to others, as well as sell at the Master Gardener Spring Garden Show every April for their scholarship fund.
Thorn-free, the Christmas cactus is easy to care for year round. After the holiday blooms have wilted away, careful pruning of each stem will result in a much fuller plant for the next year. Keep in mind that each cutting can be rooted either in water or put directly into a small pot with potting soil. This type of cacti does not need direct sunlight, and will flourish in an eastern or northern window, and likes a good night’s rest with no light for about 13 hours, not even light from headlights or a lamppost.
Today the modern Christmas cactus has flowers that are larger than grandmother’s plants and blooms both in the spring and the winter. They will bloom best while root-bound and kept evenly moist, allowing them to dry out between waterings. Christmas Cacti will resent having their roots kept wet, and will decay rapidly.
Temperature requirements: Between 60 and 80 degrees. Can be put outside in the shade in the spring after frost threat is over.
In the fall, repot your cactus in a slightly larger pot every two to three years using fresh potting soil. This blooming succulent can live to be 100 years old when taken care of properly!
If the green “leaves” turn yellowish, something is amiss. Problems can be overwatering, sunlight/darkness needs are not being met, or temperature range is too hot or cold. Plants are like people: They can either thrive or just survive if they are not happy.
TIP: While making hard-boiled eggs, allow the water from boiling the eggs to cool, and water your cacti with the calcium-rich leftover water!
SAVE THE DATE: WHEN: Saturday, April 29, 2023; WHERE: Perquimans County Rec Center, Hertford, NC. WHAT: Spring Garden Show. WHY: Master Gardeners’ Fundraiser for scholarships! Hope to have yellow Christmas cacti for sale! See you there.
Pruning Back Time: Viticulture at the Newbold-White House
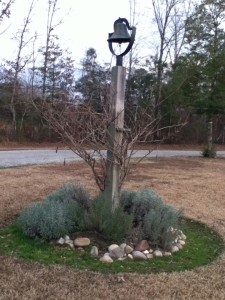
Four and a half rows……Since 2007, the vineyard at the Newbold-White House, circa 1730, located in historic Hertford, North Carolina, has been taking shape starting out on 1/3 of an acre, and growing over the years to one full acre. Thirty-Seven muscadine vines of the Carlos variety were planted first. Reds and whites stand at attention waiting for someone to find them, take them home and make wine, jelly, juice or soap.
Micki Levine and Marjorie Rayburn, both Master Gardeners, are currently the co-directors of this project, not only doing manual labor but spending time instructing the volunteers. Volunteers come every season of the year to prune, plant, and harvest the grapes, which are for sale in late August and early September.
The muscadine is a native American grape, Vitis rotundifolia, found primarily in the southeastern part of the United States. Scuppernongs are a variety of muscadine; therefore, all scuppernongs are muscadines; however, not all muscadines are scuppernongs.
Early description of the land when the Saunders family purchased the property includes “the vineyard” with the soil being perfect for growing grapes. There is a walking trail that leads to the Perquimans River where there is a dock offering folks to kayak or canoe to the historic site.
Propagating grapes
Three different methods of propagation are listed below:
- Using water bottles: 1. Wash and dry a recycled water bottle (16 oz.) Cut the bottom off. Take off the lid. With hole punch, punch out two small holes on the bottom end (holes should be opposite each other). 2. Cut 18” of string and tie the ends to the punched holes. 3. Find a long vine on your existing grape arbor. Take the bottle and insert this long vine into the bottle. 4. Pull the vine all the way through the bottle. Strip the vine of its leaves. 5. Tie the string to existing arbor for support. (See photo). 6. Take some moist potting soil and fill the bottle. Then, just wait. Leave until the fall and cut off. The bottle should be filled with roots. Cut the bottle in half, and you will have two plants.
- Brick method: Another method is less labor intensive. Simply find a long vine that comes off the base. Scratch some dirt close by, remove leaves from the vine and place on the dirt. Put a brick on top of the vine, and wait for roots to grow.
- Flower Pot Method: Similar to above, except that you put the vine with the leaves removed into a flower pot, weight down, and wait for the roots to grow.
How to eat muscadine grapes according Marjorie: Grab the grape with the stem scar (where the stem, or peduncle attaches to the grape) at your mouth. Squeeze the grape skin so the pulp goes into your mouth. Enjoy the sweetness and flavor. Swallow the pulp whole or manipulate in your mouth and spit the seeds out, then swallow the grape pulp. The grape specialist from Arkansas says this is not to be done in polite company!
Poinsettias: The secret to Re-blooming!
As I was walking down a residential street in St. Thomas one summer, a large bush with red flowers caught my attention. Walking closer, I realized it was a poinsettia bush! Surprised at the size, similar to a full sized hydrangea bush, I took my camera out!

This year for Christmas, three poinsettias arrived at our home. This year, instead of keeping them for a short time and then discarding, an attempt will be made at keeping them alive all year with the goal of re-blooming them for next year! Here is how:
- After the holidays, discard the foil wrapper and place the poinsettia in a south, east or west facing window. Since they are a tropical plant, they will do best in direct sunlight and temperature should be between 65 and 70 degrees. Soil should be loose, well-draining, and peat-based. Water the plant whenever the surface feels dry; perhaps once or twice per week. Never water every day! Putting the plant in your sink and watering well, allowing to drain before returning to window location is a good system.
- Always make sure your plants have a hole in the bottom of the container. Most plants cannot tolerate their roots submerged in water deprived of oxygen. The roots will rot if allowed to stand in water for any length of time.
At night, they can tolerate a temperature drop to 60 degrees; however, cold drafts or leaves touching a cold window can cause premature leaf drop. A “leggy” poinsettia in February is probably due to cold temperatures or extreme shifts of temperature as well as poor light.
- Timeline for re-blooming year after year:
- January to March: Keep watering when the surface is dry.
- April: Decrease watering and allow the soil to become dry between watering. Do not allow the stem to shrivel. After two weeks, move to a cool spot, such as a basement or attached garage. Keep around 60 degrees.
Second week of May: Prune stems back to four inches. This should promote new growth. Repot in a slightly larger container. Be sure to add new potting soil. Water well. Place the plant back in the sunniest window. Temperature should be 65 to 70 degrees at this point. Continue to water when the surface feels dry. New growth should appear and at this point, it is time to begin fertilizing every two weeks. - June: Move to the outdoors in a partially shaded area. Maintain fertilizing and watering schedule.
- July: Start pinching back the stems by one inch! This will create a bushier plant.
- August: Check your plant to see that it has started branching out again. Once again, pinch new stems leaving three leaves on each shoot. Bring back inside and put in your sunniest window.
- September: Continue watering and fertilizing as before.
- October: To set the bloom, poinsettias need 10 weeks of 12 hours of sunlight per day. You may need a plant light to achieve this. Starting October 1, keep your plant in complete darkness from 5 p.m. to 8 a.m. every day; perhaps in an unused closet. NO LIGHT AT ALL. At 8 a.m. move to a sunny location. Continue watering and fertilizing.
- November: The last week of November, stop the closet treatment and put the plant on the windowsill once again. A few flower buds should be seen at this point.
- December: December 15 stop fertilizing. Keep watering. Enjoy your poinsettia for another holiday season!

Growing Tumeric for the Home Cook and Gardener
The hardest part about growing tumeric is how to obtain the starter root! After much investigation, the easiest way was simply to order on the internet! Shipment was in two days, and then the fun began!

Very similar to ginger and how it is grown, Turmeric, (scientific name Curcuma longa) is a flowering plant. A perennial, rhizomatous, herbaceous plant, which native to the Indian, the roots are used in cooking.
Since Tumeric is a tropical plant, growing indoors is advisable as the plants need to 65 degrees or warmer to survive. If you are in a climate colder than zone 8, plant as an annual. Grow in the garden during summertime, then dig the rhizomes up in autumn cutting off the top growth, and store in cool dry location.
To Plant: Break apart the rhizome into small pieces. Make sure that each piece has at least two or three buds. Obtain a flower pot and fill with rich organic soil. Always ensure well drainage. Place the rhizome about 2 inches below the surface with buds facing up. Water thoroughly. It can take about eight weeks to break dormancy, to sprout and begin to grow. Be patient!
Sun requirements: In the tropics, it is grown in dappled shade. Does not like intense sunlight. Since we are not in the tropics, keep the tumeric plant in partial sun. In temperate climates, full sun is needed for optimal growth with afternoon shade.
From start to finish, it will take approximately seven to ten months to harvest tumeric. When calculating when you should plant, count back ten months from when you normally get a frost, if you are planting outside.
To store the tuber for the winter, clean loose dirt from tuber and dry in warm place for two days. When dry, store in a container with peat moss or sand. Do NOT seal the container. Store over the winter in a cool dry place (around 50 degrees).
Growing Ginger for the Home Cook and Gardener
As a home cook, one of my favorite ingredients is ginger. Gingerbread. Ginger cookies. Good for the stomach and indigestion. The list goes on and on. The idea came to me that as a home gardener, growing my own ginger (Zingiber officinale) in the garden might be fun.
 First, buy some ginger at your local grocery store, which is usually imported from China or Peru. To prepare for planting, soak the ginger root (rhizome) in warm water overnight. For container planting, fill a shallow, wide pot with well-draining potting soil. Ginger roots grow horizontally. Put the root with the eye bud pointing up and cover with 1 to 2 inches of more soil. Water and select a location that does not have a lot of bright sunlight in a warm location.
The tips at the end of each finger will sprout fairly quickly. Leaves will sprout from the ends, looking like long blades of grass. For a fully mature plant, the growing process is eight to ten months.
This herbaceous flowering tropical perennial will come back year after year in warmer climates. In colder climates where there are hard freezes, it can be grown as an annual or a houseplant. Can be grown outdoors in the spring and harvested in the fall in September. When you dig up the plant, the aroma of ginger is very apparent.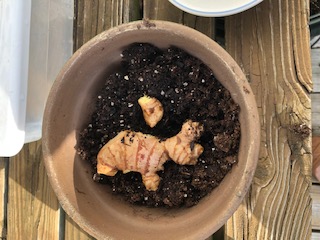
Ginger root can be frozen, made into ginger syrup, ginger honey, tea, dried ginger, and gingersnaps.
Ginger Tea by Kathi Richards
Take a little slice of ginger root (you can always add more if it’s too weak). Add hot water. Steep 4 to 5 minutes until it is the right strength for you. Can sweeten with honey. HELPFUL HINT: Peeling ginger is easy if you use the back of a spoon!
Growing Tomatoes in Containers
Photo by Jane WycheRecently, while attending a birthday party, the beautiful, bountiful tomatoes growing on the host’s porch caught the attention of everyone in attendance. Partially shaded, these tomato plants were thriving. How did Jane Wyche do it? Read below to find out her secrets!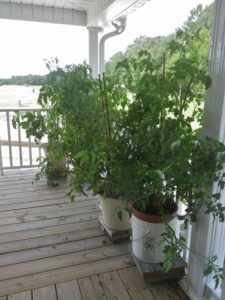
Photo by Jane WycheJane purchased Better Boy tomato plants in the spring at a local feed and seed. She left the plants on the open deck and rolled them under the overhang at night. One night she forgot to roll them under and freezing temperatures prevailed. The plants were lost to the frost. Once again, Jane went back to the feed and seed and purchased what turned out to be Big Boys and replanted.

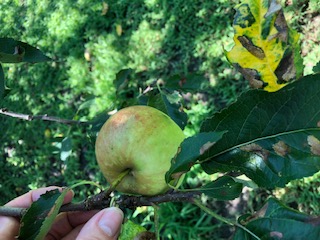
Apple Picking
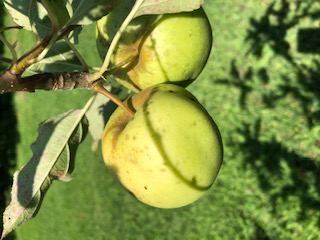 Every year about mid July, the same question always comes up: How do you know when the apples are ready to be picked? The easy answer is to pick an apple, cut it open, and see if the seeds are brown rather than white. White seeds appear in immature apples. Look at the color of the apple. The flesh should be white and not green. Taste the apple to confirm it is full of flavor.
Dropped apples are a good indicator that you should start looking for apples to be ripe, but is not a definitive sign apples are ready. Apples often drop before the fruit is ripe. When picking an apple, lift and twist, not yank and pull. It should come off easily.
Apples on the outer edges of the tree will ripen before those in the center of the tree. Fruit facing the south side will get ripe sooner because of exposure to more sunlight. Typically picking apples should cover a time span of one or two weeks, NOT picking all of the apples on the same day. Harvest time is September through October in cooler climates, and in the warmer southern climate, harvest time is late summer through early spring.
 After harvest, apples will continue to ripen. It is best to store them in a bag in the refrigerator for storage. On the countertop, apples will last for only one to two weeks. At the grocery store, the apples have been waxed to keep moisture sealed in.
There is a trick to ripening fruit after harvesting them: The paper bag method. Paper bags are not only good for taking your lunch, but also works well for ripening avocados, bananas, apples, and pears. Put the unripe fruit in the paper bag along with a banana, which is a high producer of ethylene. Close loose, and check daily. The fruit should be ripe in a day or two.
For more information about Growing Apples in the Home Garden, contact the Ask A Master Gardener Helpline at (252) 482-6585.
The Facts About Growing Industrial Hemp: New Cash Crop
This article is intended for home-interest only.
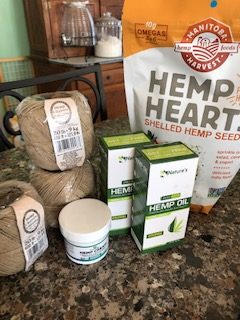 First, let’s explore a little history about hemp. Jamestown settlers in Virginia around 1616 grew the hemp plant for sails, clothing, and rope because of its strong fiber characteristics. Across the world in the 1800’s hemp was widely used for paper but declined in the 1930’s as hemp trading and production became prohibited. First used in China for paper, paper made from hemp was also used to print The Gutenberg Bible, Thomas Paine’s pamphlets and the novels of Mark Twain. The first and second drafts of the Declaration of Independence were written on Dutch hemp paper in 1776.
Final products include thousands of products such as parachutes, clothing, energy drinks, supplements and remedies containing CBC oil, hemp body care, hemp seed oil, hemp protein, pasta, salad dressings, and hemp seeds.
In 2014, Congress gave states permission to run test programs for growing and marketing industrial hemp, and North Carolina, along with 38 other states, has approved the legislation needed. Industrial hemp is 0.3 THC and can be grown in greenhouses and in fields; but don’t think it can be grown in your backyard: A license is required. It is photoperiod sensitive: Meaning hemp is a short-day plant. It flowers when days get shorter and nights get longer. Cloudy weather can make them flower.
Markets
- Seeds. Can be purchased at local grocery stores.
- Fiber. Extra strong string for gardeners, i.e., tying up tomato plants, etc.
- Parts of the flower and extracts for medicinal purposes.
Growing hemp for seed and fiber
- Grown like a field crop.
- Planted with grain drills.
- Grown from seed.
- Male and female parts.
- Harvest with combines.
Growing hemp for flower
- Grown more like a horticulture crop, bare ground, and plastic culture
- Grown from live plants.
- All female parts.
- Very little mechanization.
Production
- Often starts with growing a clone which can be cut from the mother plant. Can be propagated like Camellias.
- Grow for three weeks, then transplant.
- Clones can be transplanted in the field, similar to tobacco from May to late July.
- Frequent cultivation is required for weed control. Biweekly checks are needed to remove male plants and pests. Male plants must be pulled up. Handpick off insects. Cut tops off to sucker out for fuller plants and more flowers.
- Harvest October to November.
Harvest
- Trichomes (plant hairs) turn from clear to cloudy. Time to harvest.
- Dried in warehouses, tobacco barns or peanut trailers. Hang upside down.
- Dried to 12 to 20% moisture.
- Final product is stored in large plastic bins.
Discovering Elderberry
 Recently while driving across the country my husband and I had the opportunity to stop at Walnut Canyon National Monument, near Flagstaff, Arizona, which has the remains of approximately 200 small prehistoric cliff dwellings. We took a walk around the rim (because my middle-aged hiking skills hiking down the canyon was not possible!) of the canyon with a park ranger, and I found it interesting how people gardened there in ancient times in the desert.
 Of particular interest were the elderberry plants growing among the rocks on the cliff. In my experience, I’ve seen elderberries grow in Ohio and North Carolina, and their roots like to be kept wet, which is why they are found in abundance in the ditches in those areas. But how did they grow in the desert along with the Yucca?
Upon talking to the Rangers and doing research, I discovered that Walnut Canyon landscape is Pinyon pine/juniper and part of the largest continuous such forest in the world. Several plant communities overlap bringing together species usually thought to be separated. This creates a rare section of zones within a small area.
 Much to my chagrin upon research, I discovered that the elderberry is actually native to Arizona and the desert, growing quite nicely there. The Native Americans used the elderberries for medicinal purposes as well as food.
Here in Gates County elderberries can be found throughout the area in the ditches. In early spring a quick drive around the country roads give you a clue as to where they can be located by their white flowers. Then in July during the third-week harvesting can be done with a pair scissors, a basket, and husband in tow which is my friend, Julie, and I do every year. My sisters and I used to walk the railroad tracks in Ohio and gather the elderberries for my mother to make cobbler and pie. Also elderberry jelly is very delicious.
Enjoying Fairy Garden Magic

A fairy garden was the topic of conversation with a high school classmate of mine, Kathi, recently. Kathi sent me a few pictures and I was hooked. Before the day was over I had a plan for my own.
Enjoy the whimsical magic of your very own fairy garden! Kathi suggested starting with an old pot, perhaps an old wheelbarrow or simply starting one in your garden and adding miniature houses, furniture, fairies and special succulent plants just for fairy gardens. There are even fairy pets available! The plants Kathi bought were succulents especially for fairy gardens purchased at a greenhouse. One will need a big pot, hollowed out old log, wheelbarrow or anything you’d like. Garage sales are a source to find anything small you’d like to add to your garden. First Kathi put in potting soil in the pot, then added the fairy house. On top of this Kathi put some moss, which was a bag of mixed moss that had some pretty purple in it which added a nice touch. Then she just started building her garden adding accessories she had collected over the past month or so. Succulents are nice since they only need to be watered once in a while.

A good choice for fairy garden plants are hens and chicks, ferns for trees, lipstick or goldfish plants for bushes and baby tears for a nice ground cover. Miniature violets and roses can be used as well. Choose miniature plants or those that can be pruned and trained easily.
Creating A New Flower Bed
 Recently while on social media I came across a picture caught my eye that was posted by a friend of mine, Vickie Easterday, who recently moved here from the Columbus, Ohio, area. Vickie is making her own discoveries about life in the South and gardening. She was kind enough to share her instructions for her new flower bed.
Step one: Vickie and her husband took four 2 x 6 long boards for the sides and one 2 x 8 long boards for the head and footboard. They screw them together to make a box frame.
 Step two: They laid cardboard inside the frame to hinder any weed growth. They purchased the plants that they thought would work best. They used three hibiscus to give it the raised the pillow look, and petunias, Verbena in the center and then petunias and dianthus at the foot. Then they chose to pot the flowers so that if they didn’t like the arrangement plants could be changed. Once the potted flowers were set in place they filled the frame in with redwood mulch. Wala!. A literal country flower bed.
Step three: Must be sure to water plants until saturated be for covering with mulch.
Thanks, Vickie, for the instructions for this unusual flower bed! Happy gardening!
Gardening Stories from Gates County
Recently I was volunteering at the Gates County food bank, GEMS, passing out seeds and vegetable gardening instructions. It occurred to me that I would enjoy hearing gardening stories from Gates County residents and thought my readers might too. Here are there stories –
There was a lady from West Virginia who grew corn, squash, and okra. She said she lived in the last house on the hill and neighbors were 40 miles away. They needed to grow their own food. They tore down an old chicken house, dug up the dirt, mixed in the chicken manure and sowed the okra seed. She didn’t know how it would turn out as she had never done it before but it turned out to be the healthiest bunch of okra you have ever seen. She enjoyed it pickled with salad and it was also good in soup.
The sisters told the story of how they would go to Harrellsville to pick strawberries and a neighboring lady was growing asparagus. The sisters didn’t know how to plant asparagus and how it came back every year. They were told that it would multiply and the lady would plant a new row every year. She would cut it and roast it in a frying pan with other vegetables.
Garlic was the topic from another Gates County resident. She grows elephant garlic and garlic from Sicily. She said her husband’s aunt’s sister-in-law was from Sicily, and she brought the garlic to the United States from there. She went on to explain that the elephant garlic had a purple head and the Sicilian had a pack of bulblets at the top. Garlic should be planted in September or October and can be harvested in the next summer.
An experienced gardener likes to grow Kirm Black Russian tomatoes from seed. She would sow them directly in the ground outside when the weather was warm in her garden by the greenhouse. She had a 15 x 34′ plot which had a resident snake that would keep her company.
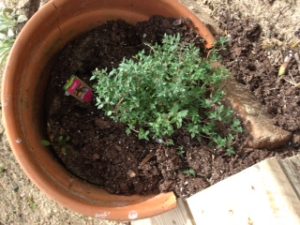 This year I have decided to grow a lavender and herb farm. I visited a lavender farm close to Richmond and bought plants there and also obtained German Thyme from a local nursery. Out of curiosity I looked up German thyme to see what the difference was between English, French and German thyme. Turns out the German thyme is also known as winter thyme because it is hardy enough to withstand the cold winters. The fragrance and culinary use is the same.
And that’s the way it is.
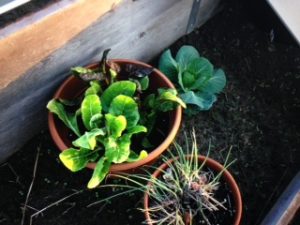
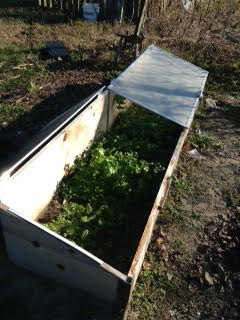
DIY: Growing Veggies in Cold Frames
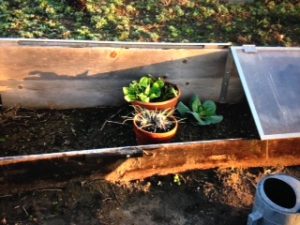 What a joy it was during the recent snow storm to go into our garden, lift the lid to our cold frame and see Swiss chard, cabbage and chives growing happily! Whether in pots or directly into the ground, cold frames can lengthen your garden’s growing time in the fall, winter and spring! Collards might be growing in your garden, but you can grow beets, spinach, carrots, lettuce and cold weather veggies all winter long. Imagine picking salad greens in February and having flowers well past your frost date! (Kits for a cold frame can be purchased or you could make your own recycling leftover lumber and old window frames.)
What is a cold frame: A bottomless box with a lid is the easy answer! Similar to a greenhouse, a cold frame collects solar energy and converts it to heat creating an environment for growing veggies in the winter months. A cold frame creates a microclimate a zone and a half warmer than your garden. My cold frame garden may be in Gates County, but the plants feel like they are in Georgia! Little maintenance is required: Propping open the lid on warm days and closing at night as well as watering is necessary. A thermometer should be used to monitor the temperature fluctuations and on frigid nights, old blankets can be draped across the cold frame to act as insulation.
Location, location, location:
• Choose a site that is sunny and well drained. Full sun is best although some shade is tolerable.
• Positioning the frame facing south would maximize exposure to light.
• The back of the frame ideally should be placed against a wall to provide protection from the wind.
• Water filled jugs can surround the frame to gather and hold extra heat.
 Other uses:
• Hardening off transplants or seedlings.
• Protection against heavy rain in the spring and garden “critters”.
• Great for starting seeds in the fall or spring.
• Overwintering plants.
Timing is also important. In this area, plant your seeds in the cold frame early enough to provide a good start before the temperature drops. On August 1, the gardener can sow seeds for scallions, chard, winter greens and parsley; on September 1, carrot seeds, and mid September mustard and turnip greens, spinach and salad greens.
Using Kitchen Soap to Control Pests
It’s a known fact: Get out the dish detergent, and everyone disappears! This everyday household staple can also be used to make undesirable insects disappear. Here is how and why:
Organic Gardeners have been using household products for many years to improve their gardens, and this old home remedy used to involve simmering a pot of water with chips of soap in it, straining, and the applying to their garden plants for control of thrips and aphids. Today we only need to open the cupboard and get out the dish detergent. One should choose, however, detergent with no whiteners or perfumes. Simply measure two tablespoons of detergent to one gallon of water, mix and pour into a sprayer bottle.
This solution is good to use to get rid of soft-bodies insects like mealybugs, whiteflies, aphids, and mites. Does not work well on caterpillars and beetles. Always test on a few leaves before spraying the whole plant, and wait a few days to see if the plant can tolerate the treatment. NOTE: This method may kill beneficial insects as well; therefore, limit use to problem areas only.
Vermicomposting: Using worms for the garden
NOTE: Many thanks to Master Gardeners Sherry Jordan and Elaine Grosjean for their presentation on vermicomposting at a recent Master Gardener meeting from which the below information was obtained.
Vermicompost is the process of composting using worms! There are approximately 4,000 species of worms and only six species are suitable for vermicomposting. The most commonly used species is the red wiggler. These hardworking worms are experts at getting rid of table scraps and putting their excretions to good use in your garden. One can get these worms from a number of sources on the internet from an earthworm grower OR perhaps a friend could give you some!
Getting started — What to feed your worms:
• Vegetable scraps
• Fruit (not citrus)
• Coffee grounds
• Bread or crackers (low salt)
• Shredded paper (good use for old newspaper)
• Banana peelings
• Crushed washed eggshells (can use blender)
Do not feed to your worms:
• Fish, meat, citrus, greasy foods, dairy, pet waste or twigs.
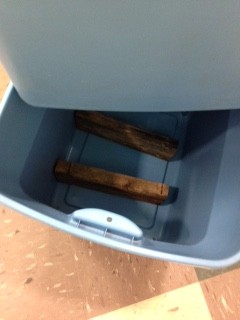
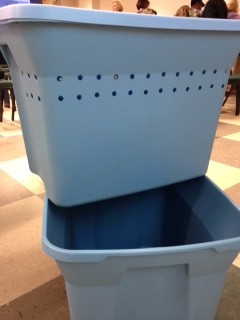
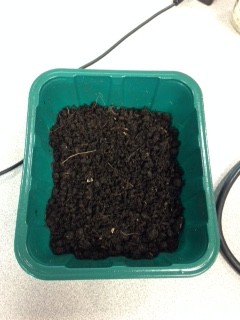
Where do they live: The simple answer is in your house in a bin! If they are happy, they will not “escape” or run away. You will need 1,000 worms per bin, approximately one pound. Their bedding consists of shredded paper, coir, peat moss and potting soil. Moisture requirements range from 60-80%; ideally 80%, like a damp sponge. Temperature requirements: Minimum 32; maximum 95. Ideal is 55 to 80. Keep away from direct sunlight. Purchase two bins. (see pictures). Drill holes in the bottom and around top/third of first (top) bin. In the bottom second bin, add two wooden pieces for elevation. Add bedding, food, moisture and worms to the top bin.
In hospitable conditions, worms can double in sixty days!
The vermicompost is good as a soil additive in that it encourages plants to grow larger and healthier, and acts as a slow release natural amendment to your garden. It also adds beneficial micronutrients, readily absorbed nutrients, good water retention and growth hormones.
Application Recommendations:
- Germination: 1 part VC to 4 parts potting medium
- Transplanting: Add ½ cup VC to hole for small plants; 1-2 cups for large shrubs and trees.
- Top Dressing: Use ½” deep around drip line.
Starting Tomatoes from Seed
Cold Frame: Growing cilantro and spinach in January with temperatures in the 30’s. Can use also for protecting young tomato seedlings.
New Year’s Resolution: Growing tomato plants from seeds.
Learning to grow tomatoes in North Carolina was my main reason for taking the Extension Master Gardener classes. I am still learning! After completing the course, Marjorie Rayburn, Extension Master Gardener from Perquimans County, and I had a conversation regarding this topic. The following information is written by Marjorie:
Why not just buy plants?
- Seeds give you greater variety – more than what you can find at garden centers.
- You can select varieties for disease resistance to diseases you have in your area (tomato spotted wilt virus, for example).
- You can get the types and colors you want – cherry, grape, paste-type, yellow, orange, pink, and red.
Here’s how to grow tomato plants from seed:
Purchase seeds early – in January. Garden catalogs usually have greater variety than local retail outlets and may provide more information about a particular variety. Select varieties with high disease resistance and good taste. Some of the heirloom varieties may have outstanding flavor, but do not always perform well under hot, humid conditions. Two flavorful varieties that have performed well in my garden are Picus (a large plum tomato) and Red Mountain (a large, red, round tomato)..
Plant seeds indoors about 6-8 weeks before you want to set the transplants outside. (You want to put them outside after danger of frost has passed). Sow seed in flats or in small cells. A soil-less peat-based mix works better than standard potting soil. Since tomato seeds germinate slowly in cool soil, an ideal temperature for the starting mix is about 80 degrees F. Some people have success with a heating mat. When the first true leaves emerge, transplant the little seedlings into plug trays (if not planted in plugs) or 3-4 inch pots. Seedlings can be grown at 60-70 degrees F. (cool house temperature). Water only enough to keep the “soil” from drying out. Fertilize seedlings with a fish emulsion or other complete soluble fertilizer as directed on the package. (You don’t want to over-fertilize.)
If you use grow lights, keep the seedlings fairly close to the lights to prevent them from getting “leggy.” You may want to transfer the seedling to a greenhouse or cold frame (see picture) a couple of weeks before planting in the garden. Before planting in the garden, expose the seedlings to a few hours of sunlight a day for a few days to reduce transplant shock. Be careful not to overwater before putting the transplants in the garden.
NOTE: My mother used egg cartons instead of flats or small cell packs. She cut off the lids and used the lids as a tray. For the right temperature and light, she put them on a table on the back porch, and kept an eye on the temperature bringing them in on those cold Justus nights.
Gardeners Battle Herbicide-Resistant Palmer Pigweed
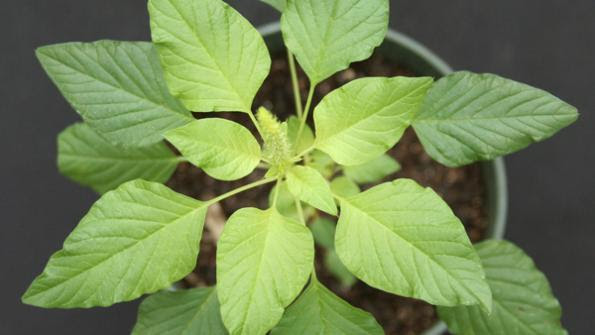 At a recent North Carolina Extension Master Gardener meeting in Edenton, a fellow Master Gardener brought in a sample of the Palmer Pigweed sharing his knowledge of the herbicide-resistant weed – a gardenerʼs headache. Curious for more information, research revealed that pigweed was named in 1877 after Edward Palmer, a plant explorer extraordinaire. He was in the right place at the right time! Thereafter known as Palmer Pigweed, it was used for pig fodder, thus the name.
The bad news: Palmer amaranthus (am-ah-RAN-thus) – Greek for unfading or evergreen -or “pigweed” has the capacity for producing up to 400,000 seeds per plant throughout the growing season! There are very few post emergent herbicide options available and they work best when the plant is less than 3 inches tall. The stalk can get six inches in diameter. The best method is hand pulling! This botanical bully has a large tap root and thrives in hot dry conditions. Imagine the growth potential in ideal growing conditions. Growth reports indicate that under ideal conditions, pigweed can grow as much as 3 inches a day! Over the years pigweed developed resistance to weed killers and became a superweed.
The NC Cooperation Extension website depicts pigweed as a weed “on steroids!” Continuing on, the website states that: “Its cluster of key survival traits seem to use almost every weed trick in the book, helping it evade and thrive under most standard weed control regimens”.
Pigweed is also difficult to identify. It closely resembles – in particular – waterhemp. Palmer pigweed leaves have one hair at the tip of the leaf blade. (see picture) Anyone suspecting Palmer pigweed infestation can contact their local extension office for control recommendations.
Nourishing North Carolina One Garden at a Time!


Recently while taking a walk at the Gates County Community Center, a garden with raised beds caught my attention to the west side of the brick building. Upon further inquiry with Lulu Eure, Director of the Community Center, it was discovered that the garden was a project with the Parks and Recreation Department, with the senior citizens, and the walkers of the exercise trail through a grant by the “Nourishing North Carolina One Garden at a Time” project.
“Teach them to grow it, and they can grow it,” stated Lulu as she took me on a tour of the garden. The tour reveals many interesting gardening techniques as well as recycling of discarded items to the betterment of the area.
An innovative way to grow tomatoes is by using a bucket – not to plant in – but to use as a fertilizer/water source. Start by drilling holes in the bottom/sides of the bucket and burying 8” deep into your garden bed. Plant three tomato plants, (OR other vegetables such as peppers), around the perimeter of the bucket. Around the outside of tomato plants, install wire for a trellis. (See picture #1) Inside the bucket, the gardener can put pure horse manure (or other fertilizer) and water which will then disperse to the plants. The gardeners at the Community Center chose to grow Better Boy, Beef Steak, and Roma tomatoes.
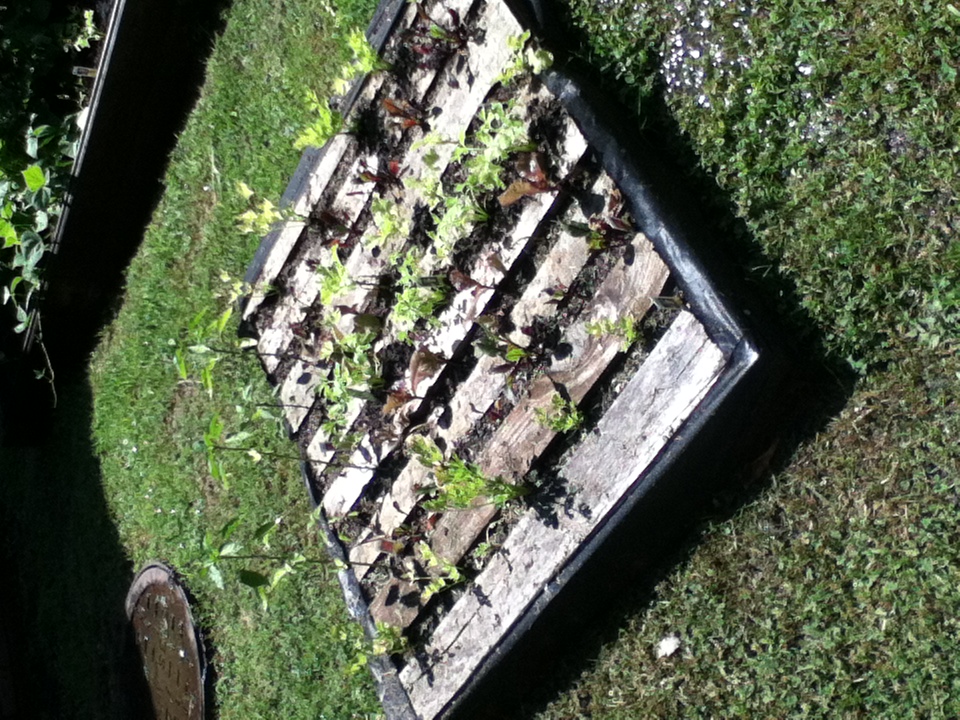
Using an old wooden pallet, the Gates County gardeners recycled the pallet by adding dirt between the slats and adding garden fabric around the edges to grow peppers, beets, lettuce and celery. (See picture #2).
Along the side of the building, herbs and flowers are grown to include dill, mint, lavender, and cilantro. (See picture #3). Since this is a sheltered area from the wind and cold, some of the herbs can be grown year round.
To view the garden, visit the Gates County Community Center at 130 US Hwy 158 in Gatesville.
An easy recipe to try is the Cabbage Casserole:
CABBAGE CASSEROLE
- ½ cabbage, medium finely chopped
- Salt
- ½ cup rice, uncooked
- ½ chopped onion
- 1 lb ground beef
- Salt
- Pepper
- 1 ½ cup tomato juice
Preheat oven to 350 degrees. Spread half of the cabbage in the bottom of the roasting pan. Sprinkle with salt. Add rice, onion, and meat. Spread remaining cabbage on top. Add salt and pepper to taste. Cover with tomato juice. Bake for 1 ½ hours or until done.
Making The Right Cut – How to Prune Tree-Form Crape Myrtles
Late January until early March is the best time to prune Crape Myrtles — during the dormant season. Using hand pruning shears or a lopper, follow these easy three steps: 1. Remove any suckers that arise from the base of plant. When your tree is young, depending on the cultivar, there may be a lot of these. As the tree matures, there will be less and less of these that need to be removed. This type of pruning can be done any time of the year, not necessarily in the spring.

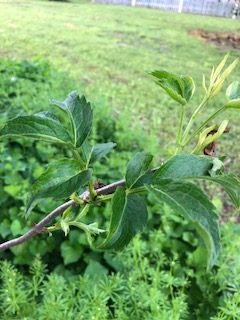
Crossing Branches – photo courtesy pender.ces.ncsu.edu
2. Remove any dead, diseased or crossing limbs. After deciding which branch needs to be removed, follow the branch back to the “joint” and remove at that point. 3. Remove the lower branches on the main trunks to keep the canopy at the desired level. When purchasing a Crape Myrtle, be sure to read the label and know the height and spread to make sure it is being planted in the space in your landscape. You may consider purchasing a dwarf or shrub type which is basically a plant with multiple stems coming from the base of the plant and requires totally different pruning techniques than the large tree type. When bringing a new plant home, the nursery has probably already pruned into a multi-trunk tree form. Yearly pruning will keep your tree in check. The home gardener can consider removing the old seed heads – if you can reach them. The seed heads may be too high to easily reach and that is okay to leave some. If you can remove them after blooming in spring, they may re-bloom in some varieties. The practice of topping at chest or waist height with a chain saw or other large saw is not needed! If the tree has been neglected for several years, one can regain the upper hand. First, select main trunks and tag those so they are not accidentally cut. Next, just follow the steps as already outlined. When young, the trees will need more attention and training, and will pay off with in the end with a beautiful specimen.
Smilax Vines Sometimes Armed With Thorns
 About fifteen years ago on my first trip to Edenton, N.C., it caught my eye . It was the middle of winter, and yet, there it was – a green vine. How could this be? Draped across the door frame of a magnificent mansion in the historic district, the vine seemed to brighten an otherwise dreary winter afternoon. Years later while taking the Extension Master Gardeners program, a discussion arose among my classmates, and the name of the vine was discovered: Smilax. Common names are catbriers, greenbriers, (types include lanceleaf, roundleaf, kidneyleaf, laurel and more), prickly-ivys, and smilaxes. This vine may be found worldwide in the tropics and subtropic regions. Grown on trellises and posts up to 10m high, some have wicked thorns that allow them to hang onto their support system. Almost indestructible, the Smilax laughs at herbicides (with its waxy leaves) and is able to come back season after season growing from its rhizomes after being cut down or even burned back by fire! Best grown in soil with a pH between 5 and 6 and growing zones 6-8, this plant can be very hard to get rid of since birds and other small animals spread the seed. The vines are either male or female, (dioecious), and females bear fruit with colors ranging from red, blue and black when ripe in the fall.
  The tangles from the dense vines provide excellent nesting and cover for birds and other wildlife. Quail, songbirds, and wild turkeys feed on the fruits, and white-tailed deer are attracted to the twigs and leaves during the winter. If left to its own devices, Smilax will grow into a perennial shrub, and is native and common throughout North Carolina and eastern United States as well as parts of Canada finding their way to moist or dry soil. One way the plant spreads is by bird droppings but also rhizomes can run extensively beneath the surface of the soil making propagation easy. When cutting back this vine, remember to wear your gloves!
Learning the Art and Science of Plant Propagation
This time of the year, gardeners look forward to getting ready for fall, planting a fall garden, digging up tender bulbs, dividing plants and taking cuttings and seeds for new plants for future use and to share with neighbors and friends. This article identifies various methods for plant reproduction for the homeowner. Important Conditions 1. Sanitation 2. Moisture levels 3. Temperature levels.
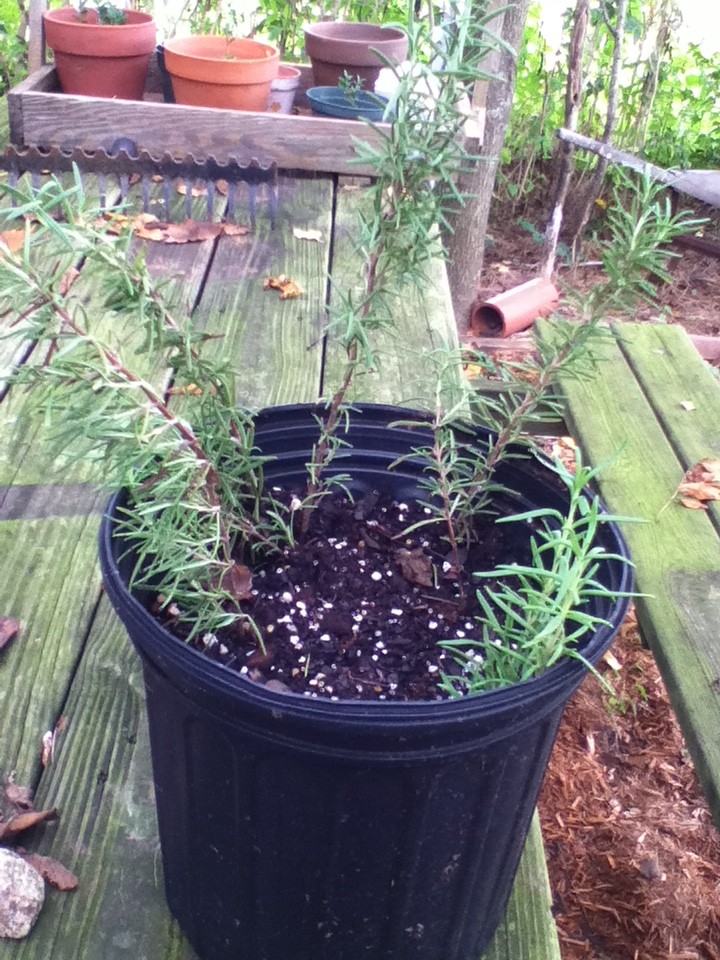
To propagate rosemary: Take some cuttings in the summertime, strip the bottom of the cutting a few inches of leaves, stick in moist soil, and place in shade. No rooting hormone needed.
Cuttings: When taking cuttings there are several rules for success: Choose healthy plants that are not diseased or wilted from under watering; with good nutrition and light. When preparing the area, make sure that good sanitation is followed. Choose potting soil that is free from pests and disinfect the containers, greenhouse, benches, soil bins and tools. Washing with 10% bleach is effective when disinfecting. Cuttings for propagation: Stem cuttings: (1) herbaceous, for woody plants — firmness of wood and time of year. (2) Softwood, late spring/early summer. (3) Semi-hardwood, fall mostly or late summer, starts to firm up. (4) Hardwood, winter.
This is How to take a stem cutting:
- Use a sharp knife or pruners to cut a piece at least 3 inches long from the plant. Cut at an angle. Remove any flowers or fruits.
- Remove lower leaves.
- Cut the leaves in half. Prevents transpiring out of the leaves. Race against time – want to grow roots and not send energy to leaves.
- Apply rooting hormone. Most plants will benefit from using rooting hormones. IAA or IBA should be in the active ingredients list. Two forms: Powder form, which is inexpensive and easy to root. For more difficult to root species – use liquid rooting hormone
- Stick into media with node in contact with or just below substrate surface. Needs high humidity situation – reducing water loss.
Pot method – put cutting in pot and simply put a plastic bag over the top. Don’t need greenhouse for home propagation. Close to 100% humidity as you can.
Leaf cuttings: Leaf cuttings work well with African Violets and begonias, and commonly used with houseplants. This method will not work with woody plants. Root cuttings: Small piece of root, stick in media, no hormones needed.
Seeds: The advantages of seed propagation are:
- Less technical
- Easily shipped
- Genetic diversity
To make sure your seed is viable (alive and capable of germination), do the following test: Put all seed in a jar of water, and the ones that float to the top are not viable. There is “nothing in there”. Seed germination: Media needs to be moist, 50 to 70 degrees in temperature, oxygen circulation, light – (sometimes – depends on species).
Common questions:
- How deep should you plant your seed: A general rule of thumb is to plant the seed 1 1/2 deep of the diameter of the seed. Really important not to plant your seeds too deep. There is not enough stored energy in seed to make it sprout.
- How far apart do I space the seeds? Do not space too closely together. Check seed packaging. When planted too closely together, the seeds compete for light, and become tall and leggy, weak seedings.
- When is it time to transplant seedlings? General rule when the first set of true leaves emerge, it is time to transplant into their next location. The most important thing to remember is to be very gentle. You never want to pull from the top; scoop from bottom – very important – take your time very carefully plant them into their new container.
To start a new grape plant is easy! Simply take one of the long vines in the summertime, strip some leaves, place that part in a pot with soil (covering the vine with soil), water (keep moist), and place a weight on top!
Layering: Layering is simply getting the cutting to root while still attached to the host plant. While roots are forming, it is getting water and energy from parent plant. Air layering 1. Girdle stem, scrape outer layer of bark all the way around the stem. (Go through the green color, down to the cream color.) 2. Cover with moist media. 3. Cover with plastic – roots will form – takes three months 4. Then cut from parent plant.
Example of gladiolus corm with cormlets.
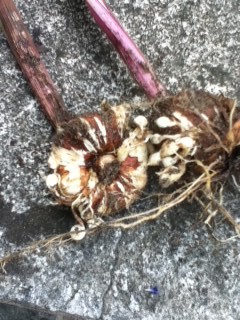
TENDER BULBS: Tender bulbs are defined as plants which have fleshy storage structures such as bulbs, corms, tubers and roots which die when exposed to cold winter temperatures if not brought indoors. Special protection is required involving digging up and bringing them into a warmer area for storage through the winter months. This can be done after the foliage dries back or is killed by the fall frost. Use caution when digging as one does not want to damage the bulb/corms or tubers. Loosen the soil on all sides with spade so roots are not cut off unnecessarily. Diseases can enter through cuts easily and cause rotting. The next step is to “cure” the bulb/corm or tuber. This can be done in about 2 to 3 weeks, depending on the temperature and type in a sheltered location away from direct sunlight. With gladiolus, the old corm and the little cormels should be removed. (See photo of gladiolus corm and cormels after being dug.) After cured, place in paper bag and label. Remember to check stored bulbs periodically to make sure they are not rotting and remove any damaged material immediately. Glads should be stored over the winter in a location providing temperatures of 35 to 40 degrees.
Mulching Trees Demonstrates Benefits in the Landscape
Mulching trees in the landscape has many benefits, but improperly done can cause disease, excess moisture in the root area and create a habitat for rodents. “Mulches are materials placed over the soil surface to maintain moisture and improve soil conditions. Mulching is one of the most beneficial acts a homeowner can do for the health of a tree. However, improper mulching materials and practices may have little, or even negative, impact on the trees in your landscape,” according to the Trees are Good brochure published by the International Society of Arboriculture. There are two types commonly used as mulch: Organic and Inorganic. Inorganic mulches include various types and sizes of stone, rubber, lava rock, and fabrics. These types of mulches do not decompose and do not provide nutrients to the soil. Organic mulches include peanut shells, wood chips, pine needles, hardwood and softwood bark, leaves, compost mixes or other plant-based materials. These types of mulches will decompose and will improve the quality and fertility of the soil. When adding mulch to your home landscape, be careful not to add to much! Proper depth, as illustrated in the picture, is approximately 2 to 4 inches. Too much mulch may result in roots growing IN the mulch instead of in the soil where it belongs causing damage to the tree with hot and/or cold weather causing stress to the tree. The root system may also “girdle” around the trees. If this occurs, pull back the mulch to only a depth of 2 to 4 inches, exposing the roots, wait about two weeks, and cut off the excessive roots. The benefits of proper mulching are many and include:
- Reduces the risk of injury from weed whackers or lawn trimmers.
- Improves fertility of soil.
- Insulates the soil from summer heat and winter freezes.
- Controls weeds and seed germination.
- Maintains soil moisture.
- Improves drainage.
- Helps to prevent some diseases.
Improper mulching can have the following adverse effects:
- Layers of thick mulch can become matted thus reducing the air flow and rain penetration.
- Deep mulch can trap moisture in the root zone causing rot and stress to the tree.
- May create a habitat for rodents.
- Creating a “volcano” look against the tree trunk can lead to the development of insect and disease as well as girdling of the roots.
- Can affect soil pH and over time lead to toxic buildups and nutrient deficiencies.
After School Program at Gatesville Elementary: Plant Container Pansies
Katy Shook, Extension Agent, started off the afternoon with an April Foolʼs joke recently during the after school program at Gatesville Elementary School. While placing a box on the table in the cafeteria, Katy told the students that today we are going to learn how to plant poison ivy! (She really had pansies in the box.) Much to the dismay of the children at first, she quickly told them April Fool and on went the lesson about planting pansies! Assisting Katy in the presentation were three Master Gardeners, Linda Dionne, Faye Smith and myself. With eight children in attendance, all eyes were on Katy and Linda as they demonstrated with bubbles how oxygen is produced by plants and used by humans. Katy also explained that air, sun, water and soil were also essential to plant growth.  On a beautiful spring day, we then went out into the school yard and had a lesson on how to plant flowers in containers. With four large pots ready with potting mix, each child took a turn in digging the hole, inserting the flower, patting it down, and then watering the flowers in the container. The Gates Co Cooperative Extension office offers gardening programs on a monthly basis in the spring and fall to our three elementary schools and the children are looking forward to their next project in May.
Organic Gardening – Learn and Grow
As spring approaches, gardening ideas come to mind with many questions. What worked well in the past? What can be done differently? Perhaps organic gardening has come to mind. Organic Seeds: Organic seeds are untreated or grown in organic environments, and are available from a wide variety of sources including online. This time of year, catalogs are arriving in the mail and ideas with growing tips can be found. Decide on the types of seeds you need for your home garden. Map out a garden plan to help you decide which varieties to choose. To be organic, the seed must be purchased as organic seen and grown in organic soil; not treated with pesticides, synthetic fertilizers/herbicides. Look at the labels of the seed packages closely and check for untreated seeds which are identified by a “U” or “O”. An “H” which stands for heritage/heirloom seeds. Preparing the soil in the spring: Is it ever too early to work the soil? As the sun rises higher in the sky as each day passes and warms the soil, it is tempting to plant early. Test your soil by picking up a handful of soil and squeeze together to form a ball. If the ball of soil can be broken by pressing with your fingers or dropping it from about 3 feet, it is dry enough. If the ball keeps its shape it still contains too much water from the spring rains. Pest control: Healthy plants and healthy soil will discourage pests; however, even in the best of gardens, pests can be a real problem. Below are a few examples: 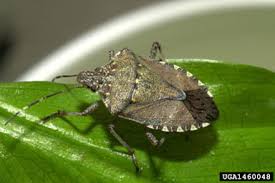 The brown stink bug – will nibble on everything. This bug is mobile and moves easily from plant to plant. A variety of controls are recommended: row covers, trap crops, and natural predators. Stink bug traps are also commercially available and are ideal for monitoring. Natural enemies include ladybird beetles, lacewings, ants; Plant sunflowers and French marigolds to attract these beneficial insects. The cabbage worm – Cabbage worms are really caterpillars of different butterflies and moths. They feed on cabbage leaves, broccoli, and closely related crops. Controls include handpicking and row cover barriers.
Buckland Elementary School SACC Program Learns Planting Techniques
Recently the SACC (School Age Child Care) Program at Buckland Elementary School was the location of the NC Extension Programʼs after school gardening session. Katy Shook and Erin Eure, both Extension Agents, provided a learning experience to 12 children on fruits and vegetables, and had hands-on guidance to planting lettuce and broccoli. Using the acronym, PLANTS to help memorize, Katy passed out an assignment with: P – Place (to live) L – Light (sunshine) A – Air. N – Nutrients from the soil. T – Thirsty – (water) S – Soil. Erin then took over the class holding a tray of green plants. Asking to identify them and explaining the techniques, Erin showed the children green and red lettuces and broccoli. Explaining that these were cool weather plants and fragile seedlings, we then went outside to the fence by the playground where the Woolly Pockets were already in place, hanging from the fence. While I helped to remove the seedlings from the nine-pack containers, Erin demonstrated how to plant the seedlings. Woolly Pockets allow gardeners to plant while standing up and no weeding required! Erin explained that if it does not rain frequently, then the children must water frequently. This gardening program is provided monthly at all three elementary schools in the county. For more information, please contact the Gates Co. Extension office at (252) 357-1400.
Newbold-White House Hosts Grape Field Day
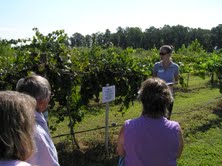 On a sunny Saturday morning recently, the Newbold-White House in Hertford hosted the Northeast Muscadine Grape Field Day. Many interesting facts and tidbits of information were shared by Erin Eure, Extension Agent, Mr. Walker Rayburn, Newbold-White House Volunteer, and Marjorie Rayburn, Extension Master Gardener Volunteer. During a tour of the vineyard, Marjorie informed us of the proper way to eat a Muscadine grape, which is not for eating in polite company: First, you pick the grape. Then put the stem end just inside your lips and squeeze. Enjoy the flavor and swallow. Some prefer to eat the seeds and other prefer to dispose of them along with the skin. Three different methods of propagation were demonstrated: Using water bottles: 1. Wash and dry a recycled water bottle (16 oz.) Cut the bottom off. Take off the lid. With hole punch, punch out two small holes on the bottom end (holes should be opposite each other). 2. Cut 18” of string and tie the ends to the punched holes. 3. Find a long vine on your existing grape arbor. Take the bottle and insert this long vine into the bottle. 4. Pull the vine all the way through the bottle. Strip the vine of its leaves. 5. Tie the string to existing arbor for support. (See photo). 6. Take some moist potting soil and fill the bottle. Then, just wait. Leave until the fall and cut off. The bottle should be filled with roots. Cut the bottle in half, and you will have two plants. Brick method: Another method is less labor intensive. Simply find a long vine that comes off the base. Scratch some dirt close by, remove leaves from the vine and place on the dirt. Put a brick on top of the vine, and wait for roots to grow.
 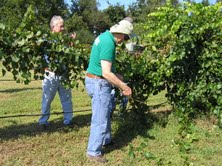 Flower Pot Method: Similar to above, except that you put the vine with the leaves removed into a flower pot, weight down, and wait for the roots to grow. Tips for growing grapes: When it is time to harvest the grapes, a pre-harvest pruning of long vines makes finding and harvesting the grapes easier. Plant in sun with well drained soil. Grapes do not like to have wet feet! Have you ever grown grapes only to find that they disappeared? Stink bugs may be the culprit. They puncture the grapes and the grapes fall off the vine. If this has happened, look on the ground and see if your grapes are there!! Inspect the grape and see if there is a “spot” where the bug punctured it.
ROSY MAPLE MOTH ARRIVES FOR VISIT
 On a recent Sunday, a visitor arrived on my front porch who was so beautiful a picture was promptly taken for identification. She was dressed all in pink and yellow with a fuzzy neckline. She wore pink stockings and had reddish/pink antennae with a yellow body and hindwings. She took no questions and left rather unexpectedly. She was easily identified on the internet as a Rosy Maple Moth (Dryocampa rubicunda). Peaking my curiosity, it was noted that this moth is quite common in North America and is in the Saturniidae family. Males have a wingspan of 32-44 mm and females have a wingspan of 40-50 mm. Wondering if she was a devil in disguise, found out that she was indeed harmless except for her caterpillars feeding mostly on red maple foliage in groups. They also feed on Silver Maple and the Sugar Maple. Late afternoon is when the adults emerge and mate in the late evening. Females then lay their eggs the next day at dusk. Eggs are laid on the underside of maple leaves in clusters of 20 to 30. After two weeks, the pale blue-green striped caterpillars that have two large black horns (also known as the Green-striped Mapleworm) will hatch. Its head is orange-brown and smooth. Can reach a length of 5 cm. Larvae usually leave the major veins alone, but outer leaf feedings gives a ragged appearance. Their range is from Nova Scotia west through Quebec to Ontario and Minnesota; south to Dade County, Florida, the Golf Coast and east Texas.
Composting for the Home Gardener
 Save those kitchen scraps! They can be recycled into nutrient-rich compost for your vegetable garden. Keep a covered container near your kitchen sink and collect waste such as eggshells, wilted vegetable scraps, used coffee grounds (including filter), used tea bags, and peelings (such as apples and bananas). Avoid adding bones, dairy, meat or animal fat of any kind.
Compost also enhances the ability to hold water and air which are both essential for plants. It is estimated that 25% of a householdʼs waste could be composted. By definition, composting is the “controlled decomposition” or materials that are organic into a soil-like substance.
A diverse collection makes for the best compost consisting of a ratio of 1/3 green materials (such as grass clippings and yard trimmings), to 2/3 carbon (dried paper materials). This material can be used for mulch landscaping, enrich topsoil, enhance plant growth as well as beneficial to the soil. For paper, save the scraps from your paper shredder (remove plastic or foil) and old torn up newspapers. Allow plenty of aeration so beneficial organisms can live. Add leaves and stems from your yard, cut into small segments, and avoid any diseased or infested plants.
When mixed with soil, compost enhances the organic matter, increases the physical properties of the soil and supplies nutrients. It also increases the soilʼs ability to support plant growth and reduce erosion.
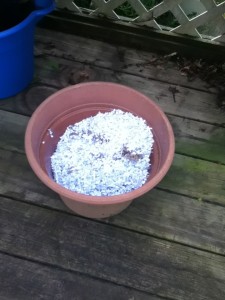 Composting can be a big project or as small as you like. Sometimes, after eating a banana, I simply take the peeling and bury it in the soil. For some gardeners, composting becomes a passionate pursuit: searching for just the right “recipe” that works the best. If space is a problem, donʼt fret – one can compost on as little space as a windowsill using a 12” flower pot! Always be sure to have drainage and a lid.
To help prevent disease, make compost tea to be applied to plant leaves which will stave off certain fungal diseases including mildew.
My favorite way to compost is by using an old plastic clothes hamper. Most are already vented and come with a lid, and only needs to be elevated from the ground with perhaps a few bricks. For the first layer, I use shredded paper from my office, add food scraps and old soil. Be sure to place the bin at least one foot from any wooden structures.
Growing Lettuce in a Container
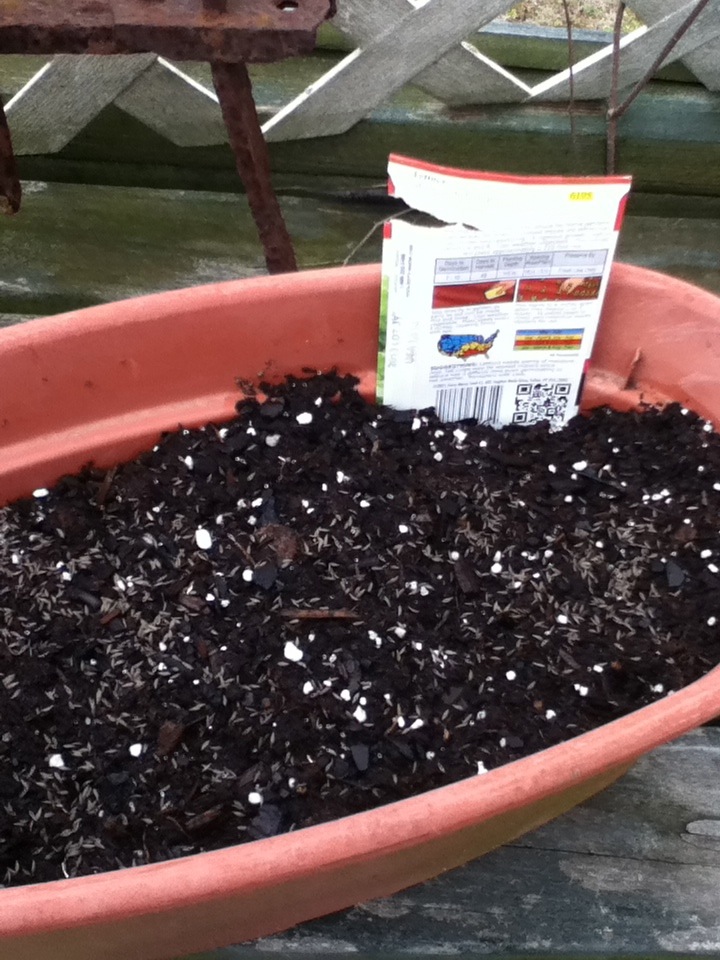
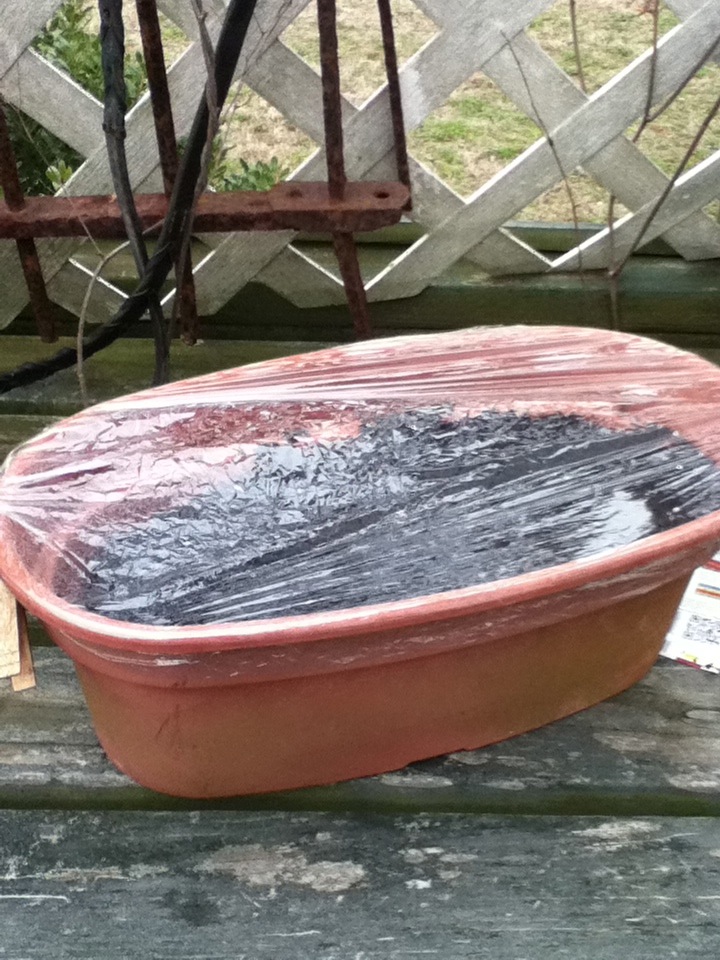
Planting lettuce in a container is very easy, and nothing is more satisfying than picking fresh salad for dinner. Here is how:
- Obtain some seed starting mix at your local hardware store.
- Put soil mix in shallow container. Sprinkle water heavily to dampen the soil.
- Sprinkle seeds over soil.
- Lightly spread more soil over seeds and pat down.
- Soil should be kept moist. Cover with plastic wrap.
When plants emerge, be sure to remove the plastic wrap at that time.
In our planting zone, lettuce and other cool weather vegetables can be planted January through April, and July through September. Can directly sow seeds in the garden as early as soil can be made fine and loose. Plant seeds every 2 inches covering firmly.
The seedlings can be thinned to 6 inches apart when 2 or 3 leaves are present.
Pick individual leaves regularly for use.
Lettuce needs plenty of moisture. I grow mine in a container on my deck with an irrigation system. However, if you do not have an irrigation system, a watering can will work just as well using the sprinkler attachment.
Lavender, Soap and the Goat Connection